Thursday, August 25, 2011

How to Clean Makeup Brushes Using Things in Your Kitchen!

What a lot of people don't know is that you need to wash your makeup brushes every other time you use them, or at the very least, once a week. Not washing your brushes is terrible for your skin, because bacteria lingers on them in old and expired products. The bacteria can cause acne and breakouts and other unwanted blemishes! Granted, brush cleansers can get very expensive, and if you do actually wash them every time you use them, then you probably don't want to go through a bottle a week. So, I thought I would share how I clean my makeup brushes with you.

WHAT YOU WILL NEED:

  • a plate (paper, plastic, or ceramic)
  • olive oil
  • anti-bacterial soap (You can use regular soap, but anti-bacterial will actually slough away all of the bacteria that can lead to acne and breakouts!)
HOW TO:

1. Place a small dollop of olive oil on one side of the plate, and a few pumps of soap on the opposite side.

2. Swish the brush back and forth on the plate, so the olive oil and soap is distributed evenly throughout the brush hairs.

 3. Rinse the brush with cool water, being very gentle as you squeeze out the dirt and product buildup.


3. Leave them to dry, but don't stand them up straight to dry!
And you're done!

See how easy that was? I have gotten my brush cleaning routine down to 10 minutes, and then I have beautiful, soft, squeaky clean brushes to use the next time I apply my makeup! Any questions? Leave them in the comments along with any requests! XOXO

Wednesday, August 24, 2011

LUSH & Sephora Haul!

Hi guys! I went to shopping in a big city near me on Monday and I went to LUSH and Sephora and a few other places I didn't get anything at. I only got one thing at Sephora but I'm so excited about it, as well as all of the stuff I got at LUSH. Without further adeu, let's get started!

Sephora

Tarte Amazonian Clay 12-Hour Blush in Blissful $25, Sephora

I was so excited to get this product! I have been lusting after it for months, and I finally decided to get it. Mine is in the color blissful, and I am absolutely in love with it. If you would like a review, please leave it in the comments.

LUSH

Oatifix Fresh Face Mask $6.95, LUSH stores

This is supposed to be a great mask for people with dry skin. I have very dry skin, and I was extremely excited to try this out. It has bananas and oatmeal in it, plus it smells like heaven! I tried it last night, but I want to try it once more before I do a full review. If you are interested in seeing a review, leave it in the comments.

Porridge Soap $6.95 per 3.5 oz., LUSH stores and lushusa.com

I have not tried this out at all, but whenever I hold it, it practically melts in my hands. I am so excited to use this! The oat milk moisturizes and soothes irritated skin, and the oatmeal bits gently exfoliate away the dead skin. If you are interested in seeing a review on this product, please let me know in the comments below.

Sweetie Pie Shower Jelly $10.95 for 8.5 oz, LUSH stores and lushusa.com

I saw this shower jelly the first time I ever went to LUSH, and have been wanting to try it since. First of all, the smell is delectable! It is very fruity, and reminds me of Twizzlers. It smells like Jolly Ranchers and licorice! I am planning on doing a full review of this, so if you are interested, again let me know in the comments!

That is it for my average-sized LUSH and Sephora haul! I hope you enjoyed this post, and like I said, if you want a review on any of these products, then let me know in the comments along with any other requests! Have a wonderful day! XOXO

Saturday, August 20, 2011

Back to School Lip Products

I feel like during the month of August, when everyone is preparing for back to school, we tend to want to reinvent ourselves. This often goes hand in hand with makeup and hair and fashion. So, I have decided to do a few posts on what I think are my favorite products to wear to school. Here we go...!


Revlon Just Bitten Lip Stain & Balm ($8.99, drugstores): This is a gorgeous lip stain, mine is in the color Passion. It is bright and very long wearing, perfect for school. Since I got mine they have come out with more colors, more natural and suited for school.

MAC Tinted Lip Conditioner ($14.50, MAC stores & counters): This is super moisturizing, and can be worn over a lipstick, lipstain, and by itself for a glossy wash of color. This is something I know I will be wearing a lot during this school year!

PosieTint ($29, Sephora): This is a bit pricey, but so worth it! PosieTint can be worn as a light pink color, or built up to be a hot hot pink color for night! This is super duper long wearing, and won't come off for hours so you're covered for school! Plus, the bottle is SO big, that you really will have to try to run out of this stuff!

Benetint ($29, Sephora): Same concept as PosieTint, but Benetint is a berry color. Super long wearing, and you will never run out!

Korres Lip Butters ($12, Sephora): These are the most moisturizing lip products I have ever used in my life! No joke, when I first applied this to my lips, I actually thought, "This feels exactly like butter!" And it's true! If you want a more natural look for school or work or whatever, these would definitely be your best bet.

C.O. Bigelow Rose Salve ($5.50, Bath & Body Works): These have no color to them, but are very moisturizing and are perfect for that "no makeup" makeup look.

EOS Lip Balms ($3, drugstores): These are super moisturizing, and just like the C.O. Bigelow Rose Salve, they are perfect for the no makeup kind of gal.


So there are my suggestions for back to school lip products. I hope you enjoyed this post, I tried to have a balance of budget friendly and high end products for you :) Leave requests and thoughts on this post in the comments, and have a great day! XOXO

Friday, August 19, 2011

Back to School: Incoming Freshman Survival Guide

Hello high schoolers, and anyone else who might be interested in this. I have decided to write a post about surviving your first year of high school. I thought I would give you some pointers, tips, and basically things I wish I had known when I was a freshman in high school. Let's get started!

Now if only everyone was that excited to go to school...


1. Always walk on the right side of the hallway, and DON'T stop to talk to your friends! When you are your friends are talking at lunch or outside of school, then you can talk, and plan to meet up somewhere in your intersecting routes and chat. Don't stop at their locker and clog up the hallways! Hallways are small as it is-- no need to make it smaller. If you are walking on the right side of the hallway, that means the people in the other direction are walking on their right side, and there's no need for shoving and discomfort. And please, don't be that one jerk who thinks it is funny to walk right in the middle of traffic going the opposite direction.

2. Get involved. I know, I know. You have heard this one time and time again. I thought that people were just trying to get me to be a part of school. But, I actually have to let you know that getting involved it the #1 way to meet people. Joining a team, or club, or even showing up to football games forces you to interact with new people, and make friends. I really wish someone would have told me that I would regret not getting more involved than I had.

3. STOP obsessing over boys. One of the very first things that freshman do is obsess about boys. To be honest, they act like little pigeons. Now, I'm not saying I didn't do this, because I did. I'm just letting you know that there is so much more to high school than just the boys. "High school isn't about finding your groom, it's about finding your bridesmaids."

4. Stop procrastinating, and start doing your work in advance. This is something that I actually followed a lot during freshman year, and I am so thankful that I did. I remember I had this one class that had an essay and a current event due each week, and sometimes even two essays. So, I remembered that if I got it all done in the beginning of the week, I could actually do something with my friends over the weekend. And it may sound nerdy, but I did some projects and assignments weeks in advance, because they always were due within the same week. This is one of the biggest tips I could give you!

5. Don't do anything  outlandish until you are sure you're ready. I think that is self-explanatory.

6. Don't hold grudges. I know that I held a grudge from this one girl who I was best friends with in middle school, and then we weren't friends anymore, and I brought that grudge to high school with me as a freshman. I wish I hadn't, I should have let go, even though it hurt very much at the time. The truth is, people change, and you need to embrace changes with open arms. In fact, if you can't embrace changes, then maybe you yourself need to change a little.

I feel like I am saying "don't" too much, and I need to tell you what TO do...

7. DO take a step back from the situation, and look at it from a different perspective. It may not be as bad as it seems. Oh boy, I wish I had known this one! I was always a bit of a drama queen, and maybe if I had gained a different perspective, I wouldn't have had half as many problems. It may seem like the end of the world now, but in a year, do you think you will actually remember it? If you will remember it, do you think it will seem as big of a deal as it is now? You may be thinking the answer is yes, but 90% of the time, it will be no. So, don't sweat the small things, and just focus on having fun.

I hope these tips helped you and relieves some stress from back to school time. Please leave any requests in the comments, along with your thoughts about this post.

Oh! I forgot my last tip!...


Thursday, August 18, 2011

Products I Regret Purchasing!

Hi, everyone! I hope all is well. I'm sorry I haven't been posting lately. I broke my laptop screen, so right now I am writing this post from the library. I felt like I had to put something up, and I saw this tag on my blog roll, and decided to tag myself haha! Now that I think of it, I probably should be doing some more back to school posts. But hey, not everyone is going back to school! So, anyways, here are some products that I regret buying and why!

1. Maybelline Pulse Perfection Mascara ($12, drugstores): I was so excited to try this product after seeing commercials for it, A vibrating mascara! How cool! Of course I hadn't heard of the Lancome Oscillation mascara at that point, so this was futuristic beauty to me. I waited until CVS had a big 75% sale, and snagged this mascara for $2! I brought it home, and tried the mascara. Without the vibration, the mascara delivers okay results. However, with the vibration, my lashes look clumpy and spidery. I mean, that's cool if I'm looking for spidery lashes, but for everyday, that's not me. Plus, the formula of this mascara is extremely wet, I can't ever picture it starting to dry up!

2. Physician's Formula 100% Natural Origin Loose Powder ($10, drugstores): This powder delivers a powdery finish, not a natural one. You can actually see that there is powder on your face, and that freaks me out. Not to mention, loose powders are messy, and I can't handle that! I actually hate this product!

3. Revlon ColorStay Foundation: ($8, drugstores): I'm actually really upset I didn't like this product because I know so many other people who love it. I actually tried hard to like it, but in the end it wasn't right for me. This foundation seemed to dry my skin out, even though I got the one for Normal/Dry skin (which I have!). It provided good coverage, but then dried my skin out, and I couldn't take it! I don't like this product.

4. Maybelline SuperStay 24-Hour Concealer ($4, drugstores): First of all, I chose a shade too light for my skin, so that turned me off. Secondly, this concealer settled into the little lines under my eyes, and gave off a weird, powdery finish. One thing about this concealer, though is that it did stay for a very long time. I don't know if 24 hours, because I don't wear makeup that long, but it certainly stayed on throughout a whole day with no touch ups.

5. Sally Hansen Amethyst Eye Palette ($6, drugstores): I would like to start off by saying that the pigmentation is amazing, especially for a drugstore product. But, I have to say that I don't find that the colors blend well. I've tried to make an eye look from this palette, but I can't because they don't blend into each other as I would like them to. Additionally, I think I've worn this once, and only used one color in it. I will not repurchase this.


Alright, so there are a few products that I regret purchasing. I hope you enjoyed this post. Please leave post suggestions in the comments, because I will do every one suggested! Have a lovely day, XOXO

Saturday, August 13, 2011

Review: Maybelline Dream Mousse Blush in Peach Satin

Today I am going to be doing a review of the Maybelline Dream Mousse Blush in Peach Satin. This was requested in my What's in My Travel Makeup Bag? post I did about two and a half weeks ago. I included this in my bag, and wore it almost every day. I was also toying around with my camera and the macro feature on it, and realized that I can do pretty accurate swatches and photos for you guys so my reviews can be a little more in depth. So, let's get into the review!

Who Is This Blush For? I don't think anyone with a dark skin tone can pull this one off. Light, fair, and medium skin tones are best suited for this blush. On olive and dark skin tones, I think it would look a bit chalky. Nonetheless, once my best friend comes over, I will definitely try it out on her and update you guys.

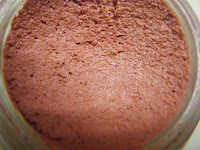
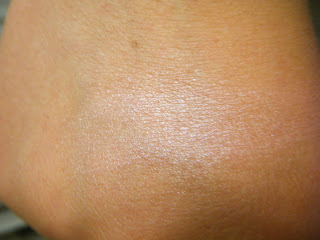
The Color: On fair, light, and medium skin tones, this blush doesn't exactly give off a shimmery, peachy color. I would describe it more as a true pink color. Swatched, it gives off a shimmery light light pink. However, on the cheeks, it looks more like a pink flush. The pigmentation is okay, like a 4/10.

The Consistency: A mousse is definitely a different way to apply blush. I have heard of liquid, cream, powder, pencils, and even gels. Though, mousse is one I have not heard. I was actually hesitant to try this blush because it was such a different form of blush. Though, it was in the 75% bin at CVS, and I wanted to expand my horizons (getting off topic...). When you rub the blush between your fingers, it sort of crumbles and forms little beads (not quite sure if that is a plus or minus).

How to Apply It: The only way I have applied this blush is to use my fingers, and dot the apples of my cheeks, and then blend it in. Although this is the only way I have applied it, you could use a small duo fibre stipple brush and tap the brush into the blush and then stipple it onto your cheeks. I know many people who use this blush with a small stippling brush. This is a way to not get your fingers as dirty when applying makeup!

Longevity: This is absolutely, definitely, hands down NOT a long wear blush. On its own, this blush will fade within four hours. To ensure longer wear, you could apply a powder blush over this mousse blush to set the blush. A blush you could use is NARS Orgasm ($27, Sephora) or E.L.F. Candid Coral ($3, Target).

To Sum It All Up: I think this is a very good blush. Those who are used to more pigmented blushes won't enjoy this blush, but I think for anyone starting out with makeup or is on a budget would find this blush suited to their needs. I would recommend this to a friend and will continue to use this blush.


Friday, August 12, 2011

Back to School Outfits: H&M!

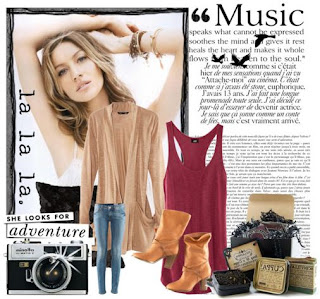
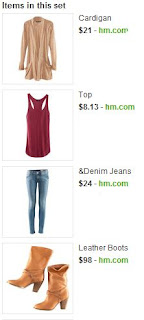
Today I am going to show you a few outfits I put together from pieces from H&M. H&M is one of my favorite stores to shop from, and it's so inexpensive! So, here are the outfits:


Those were my outfit choices for back to school from H&M. I hope you enjoyed these outfits, and can find something similar to these at H&M or any store. In the comments, let me know if you enjoy these types of posts, what other stores or brands you would like to see, and any other post suggestions!


Thursday, August 11, 2011

Back to School Outfits: Hollister Co.!

Hi everyone! Today I am going to show a collection of outfits made from merchandise from Hollister Co. I know that a lot of middle/high school and college students shop there, so I thought it would be a good place to continue with my back to school series!


Okay, so those are the outfits I put together using Hollister clothes. I hope you found this post helpful, and leave any suggestions for posts for my back to school series in the comments! Ciao!


Wednesday, August 10, 2011

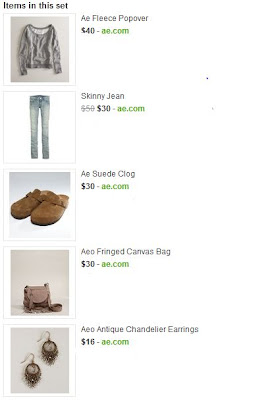
Back to School Outfits: American Eagle

When I was thinking on how I wanted to do back to school outfits, I knew I didn't want to combine it into one post. For one, all people do not have access to all of these brands and stores I will be posting. Secondly, personal styles vary from person to person. That is why I decided to break up different outfits from different stores into different posts. This way, you can just go to my blog, scroll to the post with the store yhou are going to go shopping at, and see outfit suggestions in my post. Am I making sense? Haha, anyways, these are a collection of outfits from American Eagle for back to school.


Alright, I hope you enjoyed these outfits! Happy shopping! I will be featuring Hollister Co. next! Leave any suggestions for back to school/other posts in the comments!


Tuesday, August 9, 2011

Back to School: Fall 2011 Beauty Trends!

Hi everyone! My last post in my back to school series was fall nail polish trends. I know not everyone is a nail polish addict like I am, but if you read my blog, then you probably have an obsession with makeup like I do. So, I thought I would share a few trends I have been noticing in the fall runways, as well as on celebrities, etc. So let's ge started!


If spiders freak you out, maybe you can get your Annie Oakley points by sporting spidery lashes. Try this interesting old-fashioned look by using tons of volumizing mascara (three to four coats) and then take some eyebrow tweezers and clump together your lashes by squeezing a few lashes into mini triangles. Pair this with a matte berry lip or some bronze shadow and this looks tres cute!

Thick liner is definitely a dramatic look to branch out to. If you are just starting with makeup, I wouldn't suggest going straight to this look. I would suggest a thick felt-tip liquid eyeliner (Try: NYX Super FAT Marker, $10 ULTA). Trace your upper lashline with higher pressure to create a thick line, then you can create a small wing, or just leave it be. I would definitely not combine this look with spidery lashes! Then it's way too dramatic! Moderation, readers!


Bold brows have also been making a comeback. I don't know about you, but when I think of bold brows, I think of chestnut hair, bronze French skin, and defined pouty lips. In the brow department, we always can look to beauties like Camila Belle, or Audrey Hepburn for inspiration. Brow powder is my personal choice for creating beautiful big brows. Brushing the brows upwards is also a new trend for the fall.

Alright, those are a few of fall beauty trends I am going to share with you. I hope you try out some of these looks, if you want a photo tutorial on any of it, please leave it in the comments. Leave any suggestions for back to school posts in the comments as well!

Monday, August 8, 2011

Back To School: Fall 2011 Nail Polish Trends!

Hi, everyone! Today I am going to start off my back to school series with a few nail trends I thought you would love. If you are a nail polish addict like me, then you will find this extremely interesting! If not...well, sorry! But I have a few trends to show you, let's get started!


Accent nails have been huge lately, and I anticipate that they are going to continue to be huge throughout the fall and winter. There are many ways to pull off an accent nail. One way is to paint all of your nails the same color, except for the ring finger. Then paint the ring finger a glitter or shimmer polish in the same color family. A different way to pull off an accent nail (not pictured) is to paint your nails all the same color except the ring finger again, and paint the ring finger a the same color either a shade darker or lighter.


Nudes have always been a trend for fall and back to school. Nudes actually elongate the finger, making your nails seem longer. So, if you want longer looking nails, I would suggest to start with nudes. Try: OPI San Tan-Tonio, $8 ULTA; Essie Cafe Forgot, $8 ULTA; Rimmel London Hot Cocoa, $3.99 Drugstore.com


Berries are always pretty during the fall and back to school. I don't know about you, but darker nails always make me feel more sophisticated :) Try: Cult Nails Iconic, $10 CultNails.com; Rescue Beauty Bruised, $18 RescueBeauty.com; Revlon Cherries in the Snow, $4.80 drugstores.


So there are all of the trends of nail polishes for back to school and fall. I hope you enjoyed this post. Do you have any other trends you've been noticing on the runways and such? Leave those along with any suggestions for my back to school series in the comments!

Sunday, August 7, 2011

Back to School: Leave Your Requests Here!

Hi guys! I know that I have been MIA for the past month or so. To be honest, I have been basically living out of my suitcase this entire summer. I think I was home altogether two weeks this entire summer. Hopefully that explains the lack of posts! That is why I was trying to prewrite as many posts as I could, but it didn't work out  as I had originally hoped. I hope that I can start doing more posts once the school year starts, because maybe I'll have more to write about?

Anyways, onto the real reason for this post: I am going to be doing a back to school series, starting either today or tomorrow. I will sporadically post new back to school posts. But, I don't want to post anything you guys don't want to read! So, please leave your requests for back to school posts as well as any other posts in the comments, because I will definitely do as many as possible! I will do anything from photo tutorials, hair tutorials, product recommendations, what's in my school bag, etc. Just leave what you want in the comments! Alright, so that's basically the point of this post, see you soon!